Next.js with Typescript + Styled-Components 기본 세팅하기
만들어 보고 싶은 서비스가 있는데 검색엔진 최적화가 중요해 Next.js를 사용해 보기로 했다. Next.js는 React용 SSR 프레임워크 인데, 공식 문서에서 다양한 예제를 참고할 수 있다. 그 중 with-typescript를 이용해 기본 세팅을 해보았다.
프로젝트 생성하기
아래 명령어로 타입스크립트가 적용된 next 프로젝트를 생성한다.
$ npx create-next-app --example with-typescript [프로젝트 이름]
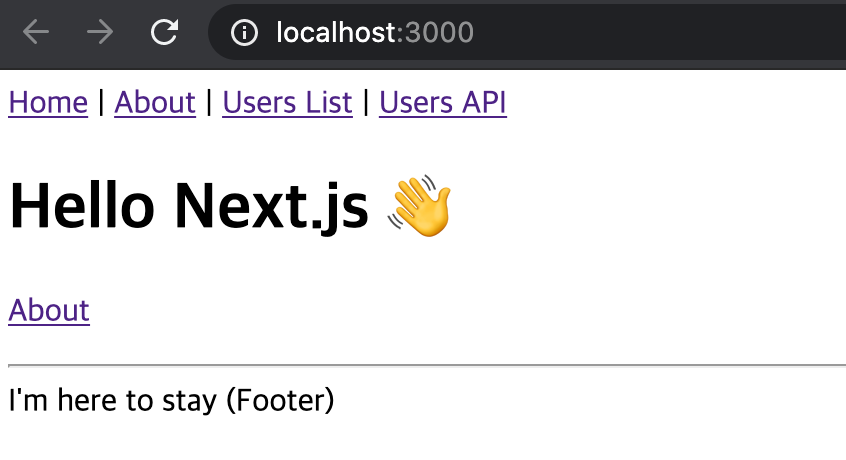
npm install 명령어를 통해 패키지를 설치하고 npm run dev 명령어로 개발 서버를 실행시키면, 아래와 같은 웹페이지가 실행된다.
폴더구조
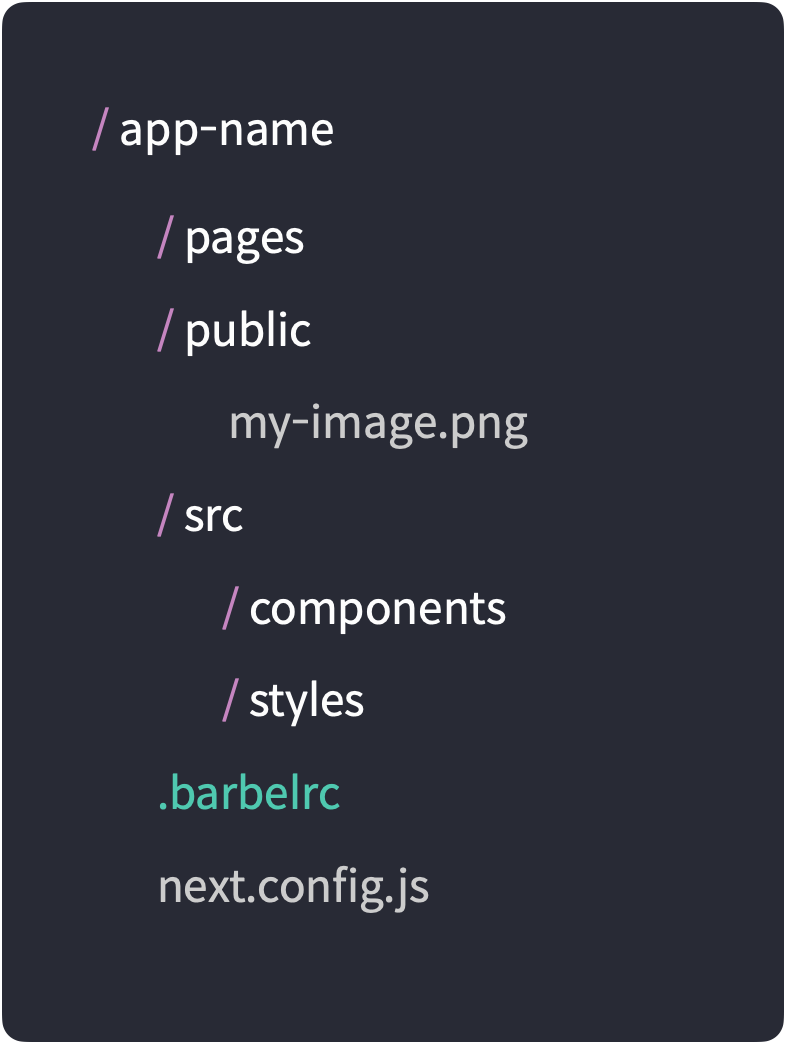
pages
next.js의 장점 중 하나인 코드스플리팅을 위해 모든 페이지들은 루트 디렉토리 내 pages 폴더에 정의되어야 한다.
/로 진입 시 /pages/index.tsx가 실행 될 것이며, /pages/about.tsx는 /about으로 라우팅 된다.
기본 예제에서도 알 수 있듯이 /pages/user/index.tsx는 /user로 라우팅 되며, /pages/user/[i].tsx는 /user/i로 동적 라우팅을 구현할 수 있다.
public
이미지와 같은 static 파일들은 루트 디렉토리 내 public 폴더에서 꺼내 쓸 수 있다. 위의 이미지 처럼 public 폴더 내 my-image.png 파일은 아래와 같이 쓸 수 있다.
<img src="/my-image.png" alt="my image" />
src
기본 예제에서는 루트 디렉토리 내 components, utils 등이 있는데 편의 상 pages와 public 폴더를 제외한 다른 코드들은 src 폴더에 넣을 예정이다. src 폴더 내 styles 폴더는 잠시 후 Styles-Components를 적용하면서 다룰 예정이다.
.barbelrc & next.config.js
바벨 플러그인 설정과 웹팩 설정을 구성하는 파일이다.
Styled-Components 적용하기
다시 본론으로 돌아와 Styled-Components를 적용해 보자.
모듈 설치
먼저 styled-components와 브라우저마다 다른 스타일링을 최소화 하기 위해 styled-normalize도 설치해 준다.
$ npm i styled-components styled-normalize
$ npm i -D @types/styled-components
전역 스타일과 커스텀 테마 정의
아까 만들어 두었던 /src/styles 폴더 내 아래와 같이 세 가지 파일을 만들 예정이다.
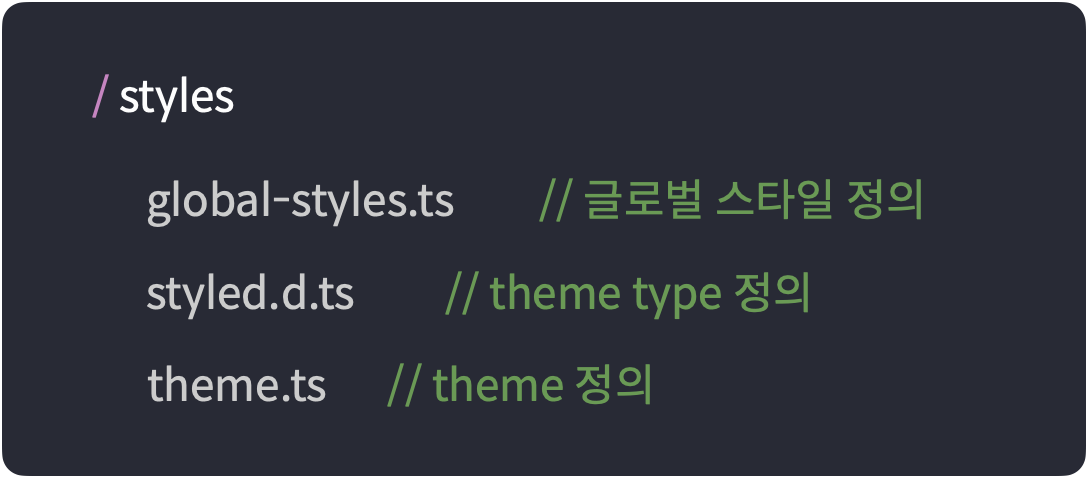
global-styles.ts
프로젝트 전역에 적용할 스타일의 정의한다. 계산하기 쉽게 10px을 1rem으로 쓰기위해 font-size: 62.5%로 정의했고 전역에 사용할 서체 등도 여기에서 정의해 주면 된다. 또한 이전에 설치했던 styled-normalize도 아래와 같이 적용한다.
import {createGlobalStyle} from 'styled-components';
import {normalize} from 'styled-normalize';

export const GlobalStyle = createGlobalStyle`
  ${normalize}
  html {
    box-sizing: border-box;
    font-size: 62.5%;
    min-width: 320px;
  }
  *,
  *::before,
  *::after {
    box-sizing: inherit;
  }
  * { font-family: 'Spoqa Han Sans', 'Spoqa Han Sans JP', 'Sans-serif';}
  a { cursor: pointer; text-decoration: none; }
`;
styled.d.ts
아래와 같이 커스텀 테마의 타입을 정의해 준다.
import 'styled-components';

declare module 'styled-components' {
  export interface DefaultTheme {
    breakPoint: string;

    colors: {
      black: string;
      yellow: string;
      orange: string;
      gray: string;
      gray_background: string;
    };
  }
}
theme.ts
위에서 정의 해 준 theme 타입에 맞게 theme을 정의해 준다.
import {DefaultTheme} from ‘styled-components’;
export const theme: DefaultTheme = {
  breakPoint: '769px',

  colors: {
    black: '#1e1f1d',
    yellow: '#edb83c',
    orange: '#eb7952',
    gray: '#6e6e6e',
    gray_background: '#f5f5f5',
  },
};
전역 스타일과 커스텀 테마 적용
이제 본격적으로 Styled-Components를 사용할 차례이다. Next.js에서 페이지가 실행될 때 가장 먼저 App 컴포넌트가 실행되는데, 따로 커스터마이징 하지 않으면 Next.js에 내장된 로직이 실행된다. 모든 페이지에 적용 될 스타일을 적용해 주기 위해 App 컴토넌트를 커스터마이징 해보겠다. 이에 대한 자세한 내용은 공식 문서를 참고!
먼저 pages 폴더 내 _app.tsx 파일을 생성하고 컴포넌트를 전역 스타일과 테마로 감싸준다. 이제 모든 페이지와 컴포넌트에서 styled-components와 커스텀 테마를 사용할 수 있다.
import type {AppProps} from 'next/app';
import {ThemeProvider} from 'styled-components';
import Head from 'next/head';

import {GlobalStyle} from '../src/styles/global-styles';
import {theme} from '../src/styles/theme';


export default function App({Component, pageProps}: AppProps) {

  return (
      <ThemeProvider theme={theme}>
          <GlobalStyle />
          <Component {...pageProps} />
      </ThemeProvider>
  );
}
아래는 styled-components를 사용하여 커스텀 테마를 적용하고, 미디어 쿼리를 적용하는 예시이다.
const ListContainer = styled.div`
  width: 50%;
  background-color: ${(props) => props.theme.colors.gray_background}
  @media (max-width: ${(props) => props.theme.breakPoint}) {
    width: 100%;
  }
`;
바벨 플로그인 추가
여기까지 하고나면 스타일링이 적용되기 전에 렌더가 되는 문제가 발생하게 되는데, 이를 해결해 주기 위해 바벨 플로그인을 추가한다.
$ npm i -D babel-plugin-styled-components
루트 디렉토리에 .babelrc 파일을 생성하고 아래와 같이 작성해 준다.
{
    "presets": [
      "next/babel"
    ],
    "plugins": [
      [
        "styled-components",
        {
          "ssr": true,
          "displayName": true,
          "preprocess": false
        }
      ]
    ]
  }
👩🏻💻 배우는 것을 즐기는 프론트엔드 개발자 입니다
부족한 블로그에 방문해 주셔서 감사합니다 🙇🏻♀️
in the process of becoming the best version of myself